Difference between revisions of "Information Systems:Phone System Quick Start Guide"
Jump to navigation
Jump to search
m |
m |
||
| Line 61: | Line 61: | ||
* All current headset users will receive replacement headsets. The old headsets are not compatible with the new phones. |
* All current headset users will receive replacement headsets. The old headsets are not compatible with the new phones. |
||
* There is now a company directory accessible via the phone. This is labeled '''3CX PBook''', or '''Remote Directory''' and lists the company's extensions. |
* There is now a company directory accessible via the phone. This is labeled '''3CX PBook''', or '''Remote Directory''' and lists the company's extensions. |
||
| − | * The default voicemail code (password) is your extension number. To change it, [[# |
+ | * The default voicemail code (password) is your extension number. To change it, [[#Managing voicemail|follow these instructions.]] |
* The intercom feature, which is enabled for many extensions in our current system, is now disabled by default. This is the feature whereby, when calling a local extension, a 2-way intercom is established immediately rather than ringing their phone. To replicate this feature in the new system, dial *11 and then the extension. |
* The intercom feature, which is enabled for many extensions in our current system, is now disabled by default. This is the feature whereby, when calling a local extension, a 2-way intercom is established immediately rather than ringing their phone. To replicate this feature in the new system, dial *11 and then the extension. |
||
===For cordless phone users=== |
===For cordless phone users=== |
||
| Line 70: | Line 70: | ||
==Other== |
==Other== |
||
| − | === |
+ | ===Managing voicemail=== |
| − | * Dial 999 |
+ | * Dial 999 to access the voicemail system. After, |
| + | |||
| − | * Press 9 to enter the options menu. |
||
| + | Dial * to play your messages. |
||
| − | * Press 7 to change the code. Enter a new PIN number. |
||
| + | Dial “9” to go to options. |
||
| − | * Follow the additional voice prompts to save your new settings. |
||
| + | Dial pound “#” to exit. |
||
| + | When you dial “9” for options, the following options will be announced by the voicemail system. Dial the respective numbers to change and update these features: |
||
| + | |||
| + | Dialing “1” allows you to change your profile status. |
||
| + | Dialing “3” allows you to dial a number. |
||
| + | Dialing “4” allows you to delete all read messages. |
||
| + | Dialing “5” allows you change your self-identification message. |
||
| + | Dialing “6” allows you to play mailbox information. |
||
| + | Dialing “7” allows you change your voicemail PIN number. |
||
| + | Dialing “8” allows you to change your greeting message. |
||
| + | Dialing “9” allows you to restart the voice menu prompts. |
||
| + | |||
[[Category: Phone System]] |
[[Category: Phone System]] |
||
Revision as of 16:59, 4 November 2019
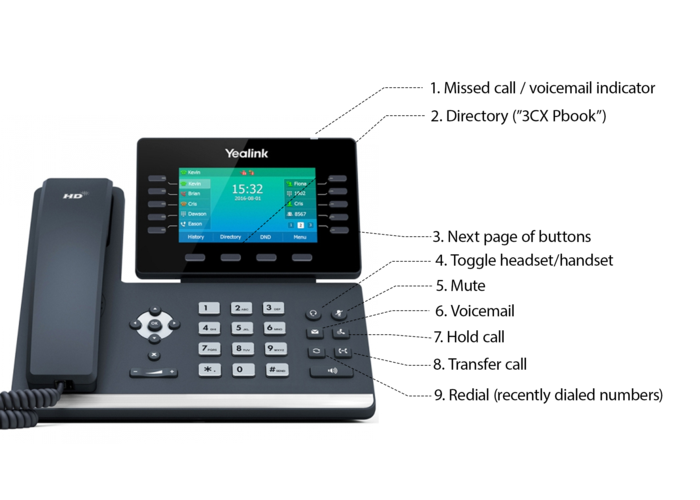
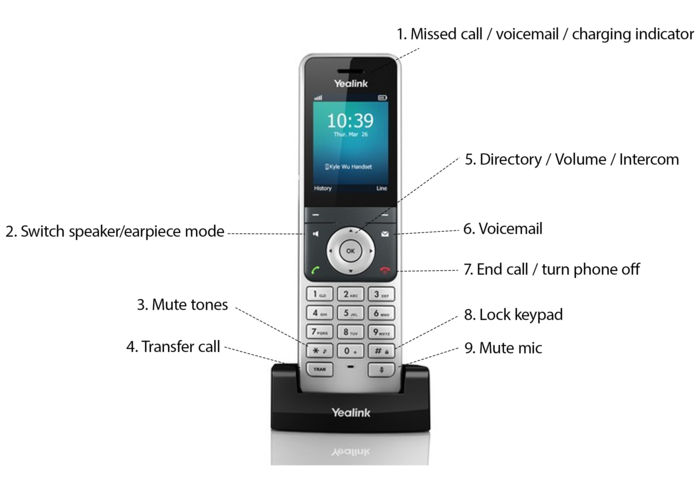
This guide was created to help staff become acquainted with the desk and cordless phones of the new phone system.
Phone buttons

| T54W Deskphone | |||||
|---|---|---|---|---|---|
| 1. Missed call indicator LED | Blinking red light with a missed call or new voicemail messages. View call history to acknowledge/dismiss this notification. | ||||
| 2. Directory | Directory of company extensions. Labeled "3CX Pbook" in our system. | ||||
| 3. Next page | Page through the button panel for additional button mappings. | ||||
| 4. Toggle headset/handset | This button will be lit green when in headset mode, and unlit when in handset mode. Although it can be used to toggle between the two modes, it is not necessary to do so, as operation of the headset or handset will automatically place the phone in the correct mode. | ||||
| 5. Mute | - | ||||
| 6. Voicemail | - | ||||
| 7. Hold call | - | ||||
| 8. Transfer call | - | ||||
| 9. Redial | - | ||||

| W56H Cordless Handset | |||||
|---|---|---|---|---|---|
| 1. Missed call / voicemail /charging indicator | Rapid, flashing red: - incoming call. Blinking red: - new voicemail or missed call. Steady red: Phone is charging. | ||||
| 2. Switch speaker/earpiece mode | - | ||||
| 3. Mute tones | Mute ringtones. This is not equivalent to Do Not Disturb (available via the menu), which routes calls directly to voicemail. | ||||
| 4. Transfer call | - | ||||
| 5. Directory / Volume / Intercom | Up arrow: Intercom, Down arrow: Directory, Left/Right arrows: Adjust volume | ||||
| 6. Voicemail | - | ||||
| 7. End call / turn phone off | Hold to turn off. The phones shut down and start up rapidly. | ||||
| 8. Lock keypad | This is to prevent accidental touches. | ||||
| 9. Mute mic | - | ||||
Things to note
- The phone system has an intuitive menu interface. Users are encouraged to navigate through the options. However, some pre-configured settings are managed by the phone system and, if changed by the user, may be overridden when the phone is re-provisioned by the server (i.e. receives a configuration or firmware update). User-specified settings that are overridden upon an update include the wallpaper, ringtones, and button mappings. The phones are not expected to re-provision on a regular basis, but we are also exploring solutions that will enable users to save their personalized settings permanently.
- When placing a call, remember to hit the Send or OK buttons (or green Call button for cordless users) after dialing the number. The phone will not automatically place the call.
- Dialing 9 for calls to external numbers is now optional.
- Headset users will experience similar functionality to the current system i.e. a call can be answered/initiated with the press of the button on the side of the headset.
- All current headset users will receive replacement headsets. The old headsets are not compatible with the new phones.
- There is now a company directory accessible via the phone. This is labeled 3CX PBook, or Remote Directory and lists the company's extensions.
- The default voicemail code (password) is your extension number. To change it, follow these instructions.
- The intercom feature, which is enabled for many extensions in our current system, is now disabled by default. This is the feature whereby, when calling a local extension, a 2-way intercom is established immediately rather than ringing their phone. To replicate this feature in the new system, dial *11 and then the extension.
For cordless phone users
- Please note that other handsets may be linked to the same wireless base. Pressing the "Line" shortcut key will show these other handsets, but there is no other use for this button other than being able to see other handsets connected to the same base.
- The "Line" key may be confused as a button to access additional calling lines. Instead, to access a second phone line while mid-call, a "New Call" shortcut will be displayed during the call.
- Phones can be charged on any dock.
- Each wireless base has a repeater. This will hopefully provide signal coverage throughout the entire building. Please report any deadzones to IT; the bases and repeaters can be easily repositioned.
Other
Managing voicemail
- Dial 999 to access the voicemail system. After,
Dial * to play your messages. Dial “9” to go to options. Dial pound “#” to exit. When you dial “9” for options, the following options will be announced by the voicemail system. Dial the respective numbers to change and update these features:
Dialing “1” allows you to change your profile status. Dialing “3” allows you to dial a number. Dialing “4” allows you to delete all read messages. Dialing “5” allows you change your self-identification message. Dialing “6” allows you to play mailbox information. Dialing “7” allows you change your voicemail PIN number. Dialing “8” allows you to change your greeting message. Dialing “9” allows you to restart the voice menu prompts.